Introduction
The "core" of a radiator is the finned section that cools your engine, not the tanks or side bands bolted to it. Mixing these up is the single biggest reason replacement radiators show up and don't fit, or fit fine but can't keep a machine cool under load.
Get it wrong, and you're looking at:
- A radiator that won't clear the engine bay or mounting brackets
- Reduced cooling capacity that leads to overheating under heavy load
- Return shipping, restocking fees, and equipment sitting idle
This guide walks through the tools you need, three practical measuring methods, how to read your results, and the mistakes that trip up even experienced techs.
TL;DR
- Core size = fin area only (H x W x thickness); overall size = tanks and side bands added, confirming physical fit
- You need a metal tape measure, calipers (optional), and a clean, stable surface
- Three methods: direct core measurement, overall dimension measurement, and row/fin-count assessment
- Confusing core vs. overall size is the most common (and costliest) measuring mistake
- When measurements don't match anything in stock, a specialized supplier can cross-reference or custom-build a match
What You Need to Measure a Radiator Core
Accurate readings start with the right tools and a radiator you can actually see clearly. A radiator still caked in mud or coated in old sealant will give you numbers that look precise but are quietly wrong.
Tools and Indicators Required
- Metal tape measure: rigid enough for straight, accurate readings across fins and tanks (cloth tapes sag and skew results)
- Calipers (optional): useful for fin thickness, tube spacing, or tight-tolerance row measurements
- Notepad, phone, or measurement app: record numbers and snap photos as you go; you'll want a reference when comparing against catalog listings
Preconditions and Setup
Before you touch the radiator:
- Power down and cool the equipment fully. Cummins' service documentation warns that hot, pressurized coolant can spray out and cause severe burns, so never open a pressure cap on a warm system.
- Drain the coolant if you're pulling the radiator out for measurement.
- Set it on a flat, stable surface, or make sure it's secure if you're measuring in place.
- Clean the core and tank surfaces. Dirt, corrosion, and leftover sealant hide the true edges of the fin area, and that's exactly where measuring errors start.
Skip any of these steps and you risk either a bad burn or a bad measurement. Neither is worth rushing.
Methods to Measure a Radiator Core
Which method you use depends on what you're solving for. Need cooling performance matched? Measure the core. Need it to physically bolt in? Measure the overall footprint. Serious replacements benefit from doing all three.
Method 1: Direct Core Measurement (Fin Area Only)
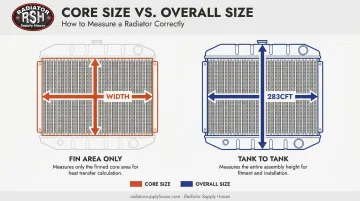
This captures only the finned cooling section, excluding tanks, brackets, or side caps.
Steps:
- Find where the tanks meet the core, and identify the true edge of the fin area
- Measure core height from the top edge of the fins to the bottom edge, tank material excluded
- Record core width side to side, excluding any tank overhang
Industry measuring guides describe this the same way: height between headers, width across the fin face between side rails, depth straight through the fin/tube pack. This method is best for confirming cooling capacity, though isolating the exact core edge gets tricky on some tank styles where the tank crimps deep into the fin pack.
Method 2: Overall Dimension Measurement (Tank to Tank)
This is the full physical footprint, tanks and side bands included, used to confirm fitment in the available space.
Steps:
- Measure full height, top of the upper tank to the bottom of the lower tank
- Record full width, outer edge of one side band to the other
- Note tank thickness (not core thickness) for total depth, excluding filler necks, hoses, or brackets
According to Griffin's radiator measuring guide, overall dimensions specifically exclude the filler neck, inlet/outlet hoses, and mounting hardware, so don't fold those into your depth reading. This method confirms fit. It tells you nothing about cooling performance on its own.
Method 3: Row Count and Core Thickness Assessment
Row count and thickness drive heat dissipation, and two radiators with identical H x W x D can have very different cooling capacity.
Steps:
- Use a flashlight to count tube rows from the side of the core
- Measure total core thickness with calipers or a tape measure
- Note whether the fins are louvered or straight, since that affects airflow and cooling efficiency
Here's where things get genuinely variable. Caterpillar's engine room ventilation guide caps fin density around 11 fins per inch for industrial applications, since more fins mean better heat rejection but also more airflow restriction, higher fan load, and greater plugging risk in dirty environments.
That trade-off shows up in Radiator Supply House's own ICEBOX catalog. A Kenworth KW/KCJ core (part #604283) runs 5 rows at 6 FPI, while a Kenworth A-Model core (#604774) runs the same 5 rows at 14 FPI. Same row count, very different cooling character. Northern Radiator's technical notes on low-clog cores confirm the pattern industry-wide: standard heavy-truck cores commonly run 16-18 FPI with louvered fins for maximum cooling, while low-clog designs drop to 13-14 FPI without louvers, trading some cooling capacity for resistance to debris buildup.
This method takes the closest inspection and gets harder on heavily corroded cores. Still, it's the difference between a replacement that fits and one that actually keeps your machine cool.
How to Interpret the Results
Misreading core versus overall measurements is the single most common way buyers end up with the wrong radiator. Here's how to judge what you've got.
| Result Type | What It Looks Like | What To Do |
|---|---|---|
| Normal/Acceptable | Measurements match published specs within a few millimeters | Proceed confidently to order |
| Minor Issues | 5-10mm variance | Often a tank style difference or inconsistent measuring point; re-measure before ordering |
| Out-of-Spec | Significant mismatch vs. anything available | Likely needs custom-built or cross-referenced replacement |
The variation across equipment brands makes this table more than academic. Core dimensions swing dramatically depending on the machine:
- John Deere 650H: core width of just 10.25 inches
- Freightliner Cascadia: core width of 35 7/8 inches — over triple the John Deere spec
- Older Caterpillar dozers: core depth as shallow as 3 3/4 inches
- Caterpillar C15/C18: core depth up to 6 inches
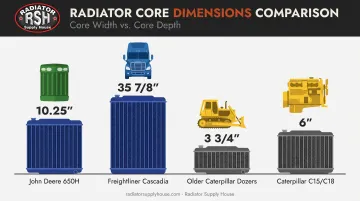
There's no universal "close enough" across these platforms.
If your numbers land in that out-of-spec zone, a supplier with genuinely deep inventory becomes useful fast. Radiator Supply House stocks parts spanning 300+ manufacturers, including Caterpillar, Komatsu, and Freightliner. The team can cross-reference your measurements against existing SKUs or route you toward an ICEBOX OEM-equivalent build when nothing off-the-shelf matches.
Common Errors and Safety Best Practices
Most measuring mistakes trace back to two things: confusing core and overall dimensions, or skipping basic safety steps to save time.
Watch for these specifically:
- Confusing core size with overall size — ordering by fin area alone can mean a unit that doesn't match your cooling needs or mounting space
- Skipping the cooldown period — handling a radiator before it's fully cooled risks serious burns from pressurized steam or coolant spray
- Not cleaning the core first — debris, mud, and old corrosion obscure the true edges of the fin pack and skew every reading you take
- Skipping calipers or a flashlight check — when row count matters for performance, eyeballing it isn't enough
None of these are complicated fixes. They just require slowing down for five extra minutes before you start measuring.
Conclusion
Distinguishing core size from overall size is the one thing that matters most when measuring a radiator. Get that distinction right, and everything else—row count, thickness, fin style—falls into place from there.
Accurate measurements protect you from the real costs of guessing: reorders, fitment failures, and cooling systems that can't keep up under load. When your equipment is a hard-to-find make, or your numbers don't line up with anything in a standard catalog, matching parts gets harder. Resources like Radiator Supply House's cooling system inventory make it easier to locate an existing part or source a custom-built core to your exact specs.
Frequently Asked Questions
Does a replacement radiator have to be the same size?
Both core and overall dimensions should closely match the original for proper fit and equivalent cooling performance. Slight tank design variances between brands are usually fine.
What is the size of a standard radiator?
There's no single standard size. Dimensions vary widely by make and model, which is exactly why measuring your specific unit's core and overall size matters.
What's the difference between core size and overall size?
Core size covers only the finned cooling area. Overall size includes the tanks and side bands. You need both figures for a proper match.
Why does row count or core thickness matter when replacing a radiator?
More rows or a thicker core means higher cooling capacity. A mismatched row count on a replacement can lead to overheating, even if the outer dimensions look identical.
Can I get a custom radiator built if I can't find an exact match?
Yes. Suppliers like Radiator Supply House can fabricate a custom radiator to your exact core and overall measurements when standard replacements aren't available.
What tools do I need to measure a radiator core accurately?
A metal tape measure covers most needs. Calipers and a flashlight help when you need a detailed row-count or thickness check for performance matching.