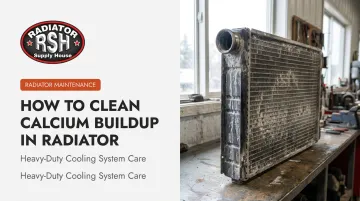
Search "clean radiator calcium buildup" and you'll find dozens of posts recommending a vinegar soak. That advice isn't wrong, exactly, but it's incomplete. What works fine on a decades-old copper-brass radiator can quietly corrode a modern aluminum core if you leave it soaking too long or mix it too strong.
This guide covers whether DIY descaling is the right call, the materials and steps involved, the variables that determine success, and the mistakes that turn a routine flush into an expensive repair.
TL;DR
- Scale insulates hot metal, cutting heat-transfer efficiency by more than half at moderate thickness, per heat-exchanger benchmark data
- Diluted vinegar and CLR dissolve moderate scale but risk corroding aluminum if left soaking too long
- Commercial cooling-system cleaners are formulated for aluminum and mixed-metal systems, with seal-safe chemistry
- Light exterior fin buildup needs brushing; internal blockages need a full soak-and-flush cycle
- Pitting, leaks, or repeat overheating after cleaning mean it's time to replace the core
How to Clean Calcium Buildup From a Radiator
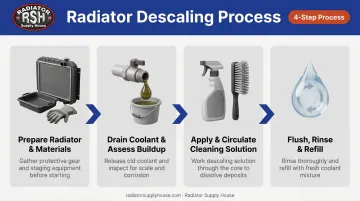
Step 1: Prepare the Radiator and Materials
Never open a cooling system while it's warm. Pressurized hot coolant causes severe burns, so confirm the engine and radiator are completely cool before touching anything.
Gather these materials first:
- Drain pan sized for your system's total capacity
- Gloves and eye protection
- Flathead screwdriver for hose clamps
- Soft-bristle brush
- Garden hose
- Cleaning solution: diluted white vinegar, CLR, or a commercial cooling-system cleaner
Check your owner's or equipment manual before starting. Many manufacturers list specific cleaning restrictions for aluminum or mixed-metal systems. Once you've confirmed your approach, place the drain pan under the radiator's drain valve (petcock) before opening any fitting.
Step 2: Drain Coolant and Assess Buildup Location
Open the drain valve and let the old coolant fully drain into the pan. Dispose of it according to local regulations. Coolant is toxic to pets and wildlife if it leaks or spills.
With the system empty, inspect the fins for external scale or debris. Reduced airflow or hot spots often point to internal blockage rather than a simple surface issue.
Close the drain valve securely before introducing any cleaning solution. A loose valve mid-soak means a mess and wasted cleaner.
Step 3: Apply and Circulate the Cleaning Solution
For exterior fin scale, spray a diluted solution onto the fins, work it in with a soft brush, then rinse with the garden hose.
For internal deposits, fill the radiator with one of these:
- A 50/50 mix of white vinegar and water
- A 50/50 mix of CLR and water
- A commercial cooling-system cleaner, diluted per the label
Soak time varies by product. Commercial cleaners typically work within a couple of hours at operating temperature, and manufacturers usually cap total run time to avoid damaging elastomer seals and soft metals.
Vinegar soaks discussed online sometimes run much longer, but there's no verified heavy-duty procedure supporting an overnight soak. Treat those claims with caution.
If you run a short soak, idle the engine briefly afterward so the solution circulates through the whole system once the thermostat opens.
Step 4: Flush, Rinse, and Refill
Drain the cleaning solution completely and dispose of it properly. Refill with clean water, idle the engine briefly, then drain again.
Repeat this rinse cycle until the water runs clear, with no residue, discoloration, or foaming. Inspect the radiator interior each time. Lingering chalky buildup means you need another cleaning pass.
Once the system runs clear, refill with the manufacturer-recommended coolant type and concentration. Skipping this step, or using the wrong coolant blend, undoes the entire descaling effort.
When Should You Clean vs. Replace the Radiator
Cleaning is worth the effort when:
- Buildup is recent and flow is only mildly restricted
- The radiator shows no cracks, pinhole leaks, or visible corrosion
- You're dealing with a single overheating event, not a chronic pattern
But DIY descaling gets risky fast on heavily scaled industrial or heavy-equipment radiators. Deposits that hardened over years of hard-water exposure don't respond well to a weekend soak. Repeated acidic cleaning on an already-stressed core can turn a fixable problem into a cracked one.
Replacement is the safer bet if repeated cleanings fail to restore flow, or if scale has already caused pitting or leaks.
For heavy equipment, agricultural machinery, and commercial trucks, downtime often costs more than the radiator itself. A single unplanned stop on a job site or during harvest can outweigh the price of a new core.
Radiator Supply House's inventory covers a wide range of manufacturers, including both core-only and complete assembly options for Caterpillar, John Deere, and Komatsu equipment. Some models, like the Caterpillar D6H, even offer a conversion core that swaps in six modular cores while reusing your existing tank and side rail. It's a practical middle ground when the structure is sound but the core isn't.
Key Factors That Affect Cleaning Results
Several variables determine how effectively a cleaning method removes buildup, starting with the water itself.
Water Hardness Level
Higher calcium and magnesium content in your water supply speeds up scale formation and makes it harder to remove once it's there. This applies to both the coolant mix and any water used to dilute your cleaning solution.
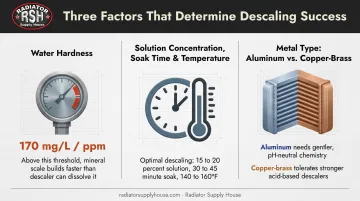
Industry guidelines give a clear ceiling: John Deere specifies total hardness below 170 mg/L for coolant mixtures, and Cummins notes that EMA, ASTM, and TMC guidelines cap make-up water hardness at 170 ppm. Using tap water above that threshold accelerates the exact problem you're trying to fix.
Cleaning Solution Concentration, Soak Time, and Temperature
Too weak a dilution won't touch established scale. Too strong a concentration, especially with acidic vinegar, risks corroding aluminum parts and degrading rubber gaskets.
Commercial cleaners specify exact dilution ranges because their chemistry is tested at that concentration. Deviating from the label, in either direction, is the most common reason DIY cleaning underperforms or causes damage.
Soak time and temperature interact with that concentration: longer soaks dissolve more scale but raise corrosion risk with acidic solutions on softer metals like aluminum, and running the solution at operating temperature improves circulation and cleaning power while requiring monitoring so the system doesn't overheat mid-soak.
Metal Type of the Radiator or Cooling System
Aluminum and mixed-metal radiators, common on newer Caterpillar, Komatsu, and John Deere equipment, are more vulnerable to acidic cleaners and need gentler, chemically balanced commercial products.
Older copper-brass radiators tolerate vinegar-based cleaning better, though you should still check solder joints afterward. Radiator Supply House's ICEBOX line reflects this split, stocking both copper-brass and all-aluminum replacement cores because cooling systems vary that much across brands and equipment ages.
Common Mistakes and Troubleshooting
Most failed cleaning attempts trace back to a handful of avoidable errors:
- Using bleach or overly concentrated vinegar — corrodes aluminum parts, degrades rubber seals, and can damage the engine block or cylinder head over time
- Skipping the drain-and-inspect step — mixing cleaning chemicals with old coolant dilutes the solution and cuts its effectiveness
- Not rinsing thoroughly — leftover cleaner residue can foam or react poorly with fresh coolant, sometimes triggering another overheating cycle
Even after avoiding these mistakes, if water still doesn't run clear after several rinse cycles, the blockage is likely deeper in the core than a garden-hose flush can reach. Professional rodding or a replacement core is the next move, not another round of the same cleaner.
If overheating continues after a full cleaning, the problem may lie beyond the radiator itself, so check the water pump seal face. Calcium and magnesium phosphate deposits are a documented cause of seal failure, and a scaled seal face keeps causing symptoms even after the radiator itself is clean.
Conclusion
DIY calcium removal works well for light-to-moderate buildup, as long as the solution, dilution ratio, and soak time match your radiator's metal type. Most failed attempts come down to the wrong chemical choice or a skipped flush step, not a flawed approach.
For heavy equipment and commercial fleets, where downtime carries a real cost, weighing replacement against another cleaning cycle is a smart maintenance call.
When a core has pitted, leaked, or resisted repeated cleaning, replacement makes sense. Radiator Supply House stocks OEM-equivalent replacement radiators, cores, and cooling components, including aftercoolers and oil coolers exposed to the same scale, across a wide range of manufacturers.
Frequently Asked Questions
Are calcium deposits serious?
Yes. Even a small amount of scale cuts cooling efficiency and traps heat that should escape through the coolant. Left unaddressed, this leads to overheating, cracked heads, warped blocks, and water pump seal failure.
Can I use vinegar to clean calcium buildup in a radiator?
Diluted white vinegar dissolves moderate scale, but its acetic acid can corrode aluminum and degrade seals if left soaking too long. It suits older copper-brass systems better than modern aluminum cores.
How often should I clean calcium buildup from a radiator?
A full internal flush is generally recommended every few years, though the exact interval depends on your coolant type and OEM schedule. Exterior fin cleaning should happen more often in dusty or dirty operating environments.
How do I know if my radiator has calcium buildup?
Watch for frequent overheating, weak heater output, or coolant that looks discolored or gritty. Visible white or chalky deposits on the fins or inside the fill neck confirm it.
Does CLR damage aluminum radiators?
CLR is milder than bleach, but the manufacturer specifically advises against using it on aluminum or inside radiators due to compatibility concerns with internal components. Verify against your radiator's exact metal composition before use.
Can I remove calcium buildup without removing the radiator from the vehicle?
Most buildup can be cleaned in place through drain-and-fill methods. Severe blockages deep in the core may require removal for professional rodding or outright replacement.